

Wow, three Sunday's in a row I've managed to get the sketch done for the day! That's a record for me these days. Regular features around here aren't so regular anymore, and that's a bummer for me. I know it's even more of a bummer for you since you are the ones who look forward to my features! I just haven't been able to bring myself to do a Scrap Stash Saturday card in weeks, but I don't know why. I think it's because I'm not feeling so creative lately, and you really have to be in a creative mindset to make a Scrap Stash Saturday card! Putting four non-matching papers together is taxing on the ol' creative mind, that's for sure!
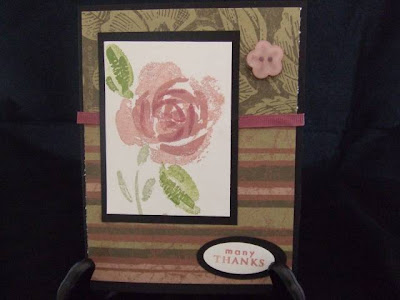
But I'm happy to say, today's sketch came together really easily. Not just the sketch, but the layout, the papers, and the stamping. Ya gotta LOOOOOOVE that!  The image that I stamped was inspired by the very talented Debbie Olson. I was looking in the SCS gallery today for more ideas on how to use my Silhouette Blooms stamp set from CHF when I ran across this beauty of Deb's. I mean, come on. This woman has more creative talent in her little finger than I do in my whole darn body! She ooooooozes artistic ability! Seriously. Anyways, her card is where I got the idea to use the bloom upside down instead of right side up. Just imagine these flowers hanging from a wooden peg drying out.
Now, I know you're gonna look at this sketch and freak out because it's blocking. But really, don't sweat it. I just took a bunch of scraps (matching) and cut them until they all fit on a white cardstock mat. I'm not gonna hold you to this particular patchwork pattern, ok? Just do whatever is easiest for you. As long as you patchwork, and as long as you use four different designer papers, I won't disown you. {{{{Gasp}}}}}. Did I just say four????? Yep, believe it or not, I did. I have four different papers on today's card. Actually, it's only 2 different sheets of paper, but I used the pattern on both sides on the paper. So, really, don't hyperventilate.

I can't wait to see your cards peeps! Be sure to upload your them to SCS using the code SSS3, ok?
Hugs,
Amy


 From Cheryl @
 From Beate @
 From Heidi @
 From Charmaine @
 From Melissa @
 From Karen (

 From Kathy @


 Charmaine has been religiously doing my sketches from nearly the beginning. She really is an amazing talent. I love all of the stuff she does. If you haven't checked out her blog, do so today. You won't be disappointed! Isn't this polka dot card amazing? This was her card based on last weeks sketch!!


 This card was shared by Paula Goff (
 Thanks to all of you for playing Super Sketch Sunday! I hope to see more of your cards this week! Have a wonderful Sunday. I am planning on getting some flowers for the deck today, and MAYBE stopping by Archivers to see the new Martha stuff. Yesterday was absolutely GORGEOUS here, but I got sunburned!!! I sat outside watching my son's baseball scrimmage but didn't have any sunscreen on because hubster and son didn't put it in the baseball bag like they were asked to! Now I'm paying the price:)!!!!


 I've got tons of graduation cards to make this season, so I'm starting early! I love this new stamp I found at Archivers. It's by Wordsworth. I first took a piece of watercolor paper, sprayed it with my mister, and then painted on three different inks with my aquapainter...More Mustard, Real Red, and Creamy Brown Colorbox Fluid Chalk Ink. When that had dried, I stamped the sentiment onto the paper with Jet Black Staz-on. I used my Cuttlebug number die cuts for the graduation year. Did you know you can cut through 2 pieces of paper when sending your die through the machine? For example, I laid two square pieces of red cardstock down on top of the 0 (zero) so I didn't have to send it through twice. This way, I was able to cut the 2, the 7, and two 0 (zeros) on one pass through. The only thing is the bottom letter or number get's slightly "wrinkled", but nothing major. Sure saves a little time!
 Simply cut a small piece of cording (maybe about 2 inches) and tie a knot at one end approx an inch in. To the right of the knot, take a stick pin and start to unravel the cording up to the knot. In less then a minute, you'll nearly have the tassel complete! Next, I punch a small hole in the middle of the cap. I thread the tassel through the hole, and follow it up with a black brad. I try to pass the brad through the cording somewhat going through so it holds it in place. If that doesn't work, just make sure when you split the brad open in the back it covers part of the extra cording to hold it in place. You can always tape the extra down too. That's all there is too it! Wasn't that simple?! I glued a small portion of the cap to the itop of the inside card, and the rest of the cap is used to pull the card from the pocket! Can you guess what the sentiment is inside the card? "Hats off to you!!!" Isn't that perfect? It's ties in perfectly with the card! It's so fun when something comes together just the way you imagined it!
 and this one is by Charmaine (Oodabug Alley)!


 It's really, really, really easy! All I did was stamp the small flower image from Doodle That all over the front of a piece of Rose Red cardstock. Then, I took a vertical strip of paper from my Basic Grey 6x6 pad (it was leftover from another card I put together at the retreat) and cut the sides of it with decorative scissors. I glued it to the front of the card. Finally, I took another small scrap piece of paper from my Basic Grey collection and punched out small circles with a regular size hole punch and then glued those on the stamped flower images to serve as the flower's center.