
Good morning! It is a beautiful, crisp morning here in MN! These are the kind of mornings that I adore. There is a cool, crisp breeze in the air (although working it's way into the 80's later on), and the birds are happily chirping themselves silly. The sun is shining through my office window, filling my room with happiness. I mean really, is this not perfection in the best sense of the word? I think so!
Well, I made a very special card for today's sketch. It's a little different than my usual sketches, in that this one is going to require you to do some work, over and above stamping. I wanted to showcase some of the beautiful paper I got in my July Verve Visual design team kit that you are just going to FLIP over! And what better way to do that than through a really fun sketch?
So ok, here's the sketch....it's a pocket card!  And not just any pocket card, this is a pocket card that is sewn together at the sides with ribbon! And, the sentiment for this card is on the INSIDE panel that slides in and out! But, you SEE the sentiment on the front of the card through the SU window punch! Isn't this a fun change of pace?
This is the card I made using today's sketch! Let me tell you, this was so much fun to make!
Here's how I created my pocket......I cut a piece of SU cardstock 3.75" x 11. I folded it in half. Next, I cut a piece of designer paper by Pink Martini Designs (Flirtini) and glued it to the front of the card. Can I just say, this new paper is TO DIE FOR!!!!! It's ultra hip and FUN and will be available through Verve once it opens up for business! It's quickly becoming one of my favorites papers, because we all know how much I love funky, bold, bright designs! Once I got my designer paper adhered to the front, I rounded the corners at the top, and then I used my window punch in the lower right hand corner. I used my round tab punch to make the notch at the top of the card.
Next comes the sewing. Using my ruler, I made light pencil marks along the edge of my card every 1/2". Then I used my 1/8" circle punch to punch holes up the side of the card to weave my ribbon through. I adhered the ends of the ribbon to the back of the card using glue dots, which are strong enough to hold the ribbon. Just weave your ribbon through the holes just like you were making a slip stitch, threading the ribbon from the bottom and moving up through the hole, repeating this pattern all the way up the side! Hopefully that makes sense. Really, feel free to use any manner of stitching up your sides, the only requirement is that you use ribbon!
Next I cut a piece of Whisper White cardstock narrow enough to fit inside the card WITH a mat around it (see photo).
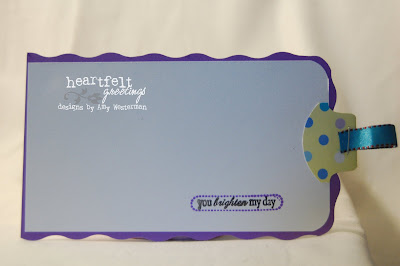 Then, I slipped it inside the card and drew in light pencil around the window punch so I would know where to stamp my sentiment. The sentiment I used is from Verve Visual. The dotted window around the sentiment is part of the 6 piece set, which includes 4 sentiments, the dotted window (shown), and another dotted straight line stamp. I really love these sentiments. As I said yesterday, they are specifically designed to be used with the SU window punch! Be sure and erase your pencil marks after you stamp your sentiment!
I used my round tab punch for the tab at the end of the inside panel, and to this I stapled a ribbon loop! The ribbon is by May Arts and is beautiful! You'll be able to buy this at Verve, which will have a full-fledged online craft store where you'll be able to buy not just the Verve stamp line, but all your favorite papers, ribbon and tools as well! How cool is that?
Ok, now back to the front of the card. The flower is a stamp from Outlines Rubber Stamp Co. I've had it for a while and never really liked it much. But I needed a big blossom for this card, so out she came. I painted the blossom with my H2O shimmery paints. You can't tell through the photos here, but these babies are beautiful!!!! Each one is outline with my Stardust Gel pen for more "wow", and I also used my white gel pen to make white polka dots all over the blossom. I used some more May Arts teal ribbon around the flowers, making more ribbon loops and adhering them to the blossom. So much fun!
I cannot wait to see some of the masterpieces you guys will come up with using this sketch! Be sure and send me a link to your creations. I am going to try and start posting some of those again if I can find the time!


This is just adorable, Amy! I love everything about it! It's just so darling!
ReplyDeleteSuper Sketch!! Will be giving this a try in the next day or so. Love he ribbon, paper and stamping. Verve - can't wait! lila
ReplyDeleteI love this card Amy, so pretty!! We did get your nice cool weather now here in Maine - thank! :)
ReplyDeleteOk - so I have been visiting your site for a while now, and apparently have missed the Sunday Skethces, but I just LOVE this one. It is AWESOME!!! I cannot wait to make something like this for an invitation to a scrapover that we are going to be doing later this summer or early fall, I hope earlier but this is perfect, thanks for the inspiration!
ReplyDeleteFabulous card, Amy! I saw this post late last night, but was too tired to comment. Then I had a dream that I made one of these, only I stitched up all the sides and couldn't get the card out of the pocket! LOL! Anyways, love the card.
ReplyDeleteWell, between phone and toddler interruptions it took me ALL DAY to make this card! I put a link to my version (posted in my SCS gallery) in my name. Fun card!
ReplyDeleteI am sooooo excited by this. I was just trying to come up with a fun card for my SIL's birthday (tomorrow). This will be great since the card will be hand-delivered!!!
ReplyDeleteThanks SO MUCH for the inspiration!! You NEVER cease to WOW me!!
~Juliana
I tried this sketch. I didn't do the "window" like you did. I put the sentiment on the outside and left the tag on the inside blank for a personal message to the birthday girl!
ReplyDeletehttp://inwiththeoldpp.blogspot.com/2007/07/pocket-card-i-did.html